
DD
"Rambo"
Hey everyone,
I thought I would throw together a post that has methods of plumbing for aquariums.
From the age of 16-24 I worked for my father doing plumbing so I learned a thing or two about plumbing, so I thought I would share.
Overflows
Durso:
The durso overflow is a typical overflow standpipe that you'll find in most reef ready tanks. The best way I can describe it is, a pipe with a tee at the top, followed by a 90 degree elbow connected at the side of the tee pointed downwards, at the top of the tee you'll have a cap that's drilled with a piece of airline tubing.
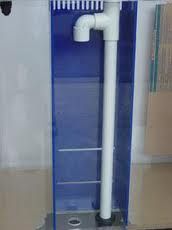
Here's a link with more info about how to build one: http://www.dursostandpipes.com
Herbie:
The herbie setup consists of two drains, one below the waterline in your overflow box that has a strainer on it, the second just below the waterline without a strainer. The purpose of having two drains is dual redundancy. If the main drain line clogs, you have a second drain to keep your aquarium from flooding. The key to this method is having a pure siphon which eliminates gurgling and bubbles going down your overflow. It is recommended that you have a ball valve on the main drain line in order to tune it properly to match your return pump.

Here's a link with more info about how to build one: http://gmacreef.com/herbie-overflow-reef-tank-plumbing-method-basics/
Bean Animal:
The bean animal design has the most redundancy built into it. With the bean animal, you have triple redundancy. If your first drain plugs up, you have a second, if that plugs as well, you have a third.
The advantage of this design: ain't no way your tank is going to overflow. Disadvantage: you need three holes drilled just for this design.
Here's a link with more information regarding the setup and design: http://www.beananimal.com/projects/silent-and-fail-safe-aquarium-overflow-system.aspx
DIY Overflow:
Please see post number 4 for youtube video.
Now onto plumbing basics.
Glue and Primer:
You should prime, then glue every fitting with the exception of bulkheads. Bulkheads you should only glue because the primer will eat away at the plastic. Bulkheads are made of ABS so the primer will do a number on it.
Pipe:
There are two types of PVC: Schedule 40 and Schedule 80
Schedule 40: this type of pipe is used specifically for drain lines in the plumbing industry. For our purposes, whether drain or pressure, we are fine to use this. The only exception is on extremely high pressure applications. An example would be if you're going to use this on a closed loop with an incredibly ridiculous flow rate. Even then, meh. If you're not blocking flow, there is no back pressure.
Schedule 80: This is your typical grey PVC pipe. The traditional use of sch. 80 is for pressure uses. Water lines and such. And by pressure, imagine your house plumbing. When you shutoff a faucet, your plumbing system becomes pressurized by your water line coming into your house from the city. Schedule 80 was designed with this in mind. It's thicker, and stronger. It's also ridiculously expensive to use. Many people like the looks of it because it's not white.
My advice, for what it's worth: Save your money and use schedule 40 pipe. If you don't like the looks of it, buy a can of krylon fusion and spray paint it. Even if we are running a pump with extremely high pressures, there really aren't too many times when that flow would be blocked, causing back pressure. Back pressure will blow the side of PVC right out along with fittings lol! Most of us don't have the "shutting the faucet off" type of applications in our aquariums. Save the cash and spend it on corals and other necessary equipment.
Fittings:
There are so many different types of fittings for PVC that it would take me forever to download pics of them. So I will just do my best to describe them.
90's or elbows:
This is exactly what it sounds like, a 90 degree fitting. They come in several variations. You can have slip on both ends where you can insert a pipe. They also come with slip on one end, and what is referred to as "street" on the other. What this is, is a slip on one side where you can insert a pipe, the other end is basically pipe diameter so that you can insert the street 90 into another fitting. A pic would probably help on this:
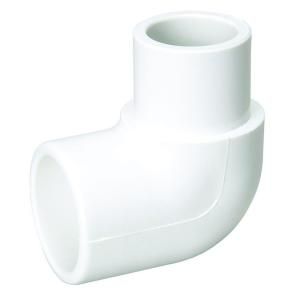
90's also come threaded on one end, barbed, etc. The possibilities are endless. If you can't find the fitting you're looking for at one menards, go to another, they probably will have it.
45's, also called elbows to make things more confusing
45's or elbows are extremely useful fittings. I'm of the opinion that if you can get away with not using 90's on anything, you should. 90's impede flow. If you can stay away from using them on a drain line, do so. Sometimes we don't have a choice and are forced to, which is fine. It's just a preference of mine, but they do impede flow lol!
The same configurations available for the 90's are almost all available on 45's. These also come in "street" variations which are really helpful, almost more so than street 90's.
Unions:
Unions are useful for taking your plumbing apart. If you need to service your return pump, you better hope you have a union installed. The best way to look at this is to plan in advance any possible reasons you would want to be able to dismantle your plumbing. A couple examples:
You're moving, you need to dismantle the tank, but you didn't use unions. Now you're forced to cut all your plumbing away. Next example is if you want to remove your sump for replacement, or cleaning. With unions, all you have to do is unthread the nut, then remove your sump. Just make sure to account for the rubber o ring so you don't lose it.
Also, make sure that you have the nut installed onto the fitting prior to glueing it up. You don't want to glue the union on, only to find that you forgot to include the nut! Don't laugh, I've done it and had to pull the union off really quickly before the glue set.
Ball Valves:
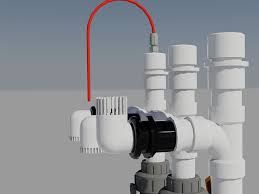
Ball valves are very useful. They allow you to regulate flow, and also shut down flow. If you're going to spend some cash on plumbing, here is where you do it. Ball valves come in several types: lever handle, spigot type round handle, union ball valves. Union ball valves are pretty nice. You can remove the valve so that you can clean it. Great invention!
Gate valves:
These are kind of like a ball valve with unions but allow you to dismantle the actual valve for cleaning. These are also extremely expensive lol!
Check Valves:
Some people swear by check valves for your return line, some people hate them. Here's why they're hated lol: The stick. Yup, that's all there is to it. Now how to get around that little fact is to make sure you engage that check valve regularly, as in every couple days. If you shut down your pumps to feed, awesome! If you don't, you'll probably have check valves that'll fail.
The biggest killer to ball valves, gate valves, check valves, etc is calcification. That's why it's always a good idea to have unions before and after a valve.
Important note regarding valves, unions, check valves, etc
When laying out your plumbing and purchasing your fittings, please make sure that you're buying "flow through" types. These are more expensive but what it basically means is that the if the fitting is 1", the entire valve is 1" all the way through.
If you can't find "flow through", buy one size up. So if your return line is 3/4", you have to buy a 1" union/valve/etc. and buy 3/4" reducer bushings. Sounds stupid right? Try this experiment next time you go to HD, Lowes, Menards: pick up a 3/4" fitting, now pick up a 3/4" union/valve/etc. Look through them. The 3/4" union/valve/etc is smaller than 3/4". If you have any fitting in your plumbing line that is smaller than your pipe, the whole line effectively becomes the smaller size. So what you want to do is compare the unions/valves/etc to what size pipe you're working with, and make sure to get the union/valve/fitting that matches and doesn't bottleneck your flow.
I thought I would throw together a post that has methods of plumbing for aquariums.
From the age of 16-24 I worked for my father doing plumbing so I learned a thing or two about plumbing, so I thought I would share.
Overflows
Durso:
The durso overflow is a typical overflow standpipe that you'll find in most reef ready tanks. The best way I can describe it is, a pipe with a tee at the top, followed by a 90 degree elbow connected at the side of the tee pointed downwards, at the top of the tee you'll have a cap that's drilled with a piece of airline tubing.

Here's a link with more info about how to build one: http://www.dursostandpipes.com
Herbie:
The herbie setup consists of two drains, one below the waterline in your overflow box that has a strainer on it, the second just below the waterline without a strainer. The purpose of having two drains is dual redundancy. If the main drain line clogs, you have a second drain to keep your aquarium from flooding. The key to this method is having a pure siphon which eliminates gurgling and bubbles going down your overflow. It is recommended that you have a ball valve on the main drain line in order to tune it properly to match your return pump.

Here's a link with more info about how to build one: http://gmacreef.com/herbie-overflow-reef-tank-plumbing-method-basics/
Bean Animal:
The bean animal design has the most redundancy built into it. With the bean animal, you have triple redundancy. If your first drain plugs up, you have a second, if that plugs as well, you have a third.
The advantage of this design: ain't no way your tank is going to overflow. Disadvantage: you need three holes drilled just for this design.

Here's a link with more information regarding the setup and design: http://www.beananimal.com/projects/silent-and-fail-safe-aquarium-overflow-system.aspx
DIY Overflow:
Please see post number 4 for youtube video.
Now onto plumbing basics.
Glue and Primer:
You should prime, then glue every fitting with the exception of bulkheads. Bulkheads you should only glue because the primer will eat away at the plastic. Bulkheads are made of ABS so the primer will do a number on it.
Pipe:
There are two types of PVC: Schedule 40 and Schedule 80
Schedule 40: this type of pipe is used specifically for drain lines in the plumbing industry. For our purposes, whether drain or pressure, we are fine to use this. The only exception is on extremely high pressure applications. An example would be if you're going to use this on a closed loop with an incredibly ridiculous flow rate. Even then, meh. If you're not blocking flow, there is no back pressure.
Schedule 80: This is your typical grey PVC pipe. The traditional use of sch. 80 is for pressure uses. Water lines and such. And by pressure, imagine your house plumbing. When you shutoff a faucet, your plumbing system becomes pressurized by your water line coming into your house from the city. Schedule 80 was designed with this in mind. It's thicker, and stronger. It's also ridiculously expensive to use. Many people like the looks of it because it's not white.
My advice, for what it's worth: Save your money and use schedule 40 pipe. If you don't like the looks of it, buy a can of krylon fusion and spray paint it. Even if we are running a pump with extremely high pressures, there really aren't too many times when that flow would be blocked, causing back pressure. Back pressure will blow the side of PVC right out along with fittings lol! Most of us don't have the "shutting the faucet off" type of applications in our aquariums. Save the cash and spend it on corals and other necessary equipment.
Fittings:
There are so many different types of fittings for PVC that it would take me forever to download pics of them. So I will just do my best to describe them.
90's or elbows:
This is exactly what it sounds like, a 90 degree fitting. They come in several variations. You can have slip on both ends where you can insert a pipe. They also come with slip on one end, and what is referred to as "street" on the other. What this is, is a slip on one side where you can insert a pipe, the other end is basically pipe diameter so that you can insert the street 90 into another fitting. A pic would probably help on this:

90's also come threaded on one end, barbed, etc. The possibilities are endless. If you can't find the fitting you're looking for at one menards, go to another, they probably will have it.
45's, also called elbows to make things more confusing
45's or elbows are extremely useful fittings. I'm of the opinion that if you can get away with not using 90's on anything, you should. 90's impede flow. If you can stay away from using them on a drain line, do so. Sometimes we don't have a choice and are forced to, which is fine. It's just a preference of mine, but they do impede flow lol!
The same configurations available for the 90's are almost all available on 45's. These also come in "street" variations which are really helpful, almost more so than street 90's.
Unions:
Unions are useful for taking your plumbing apart. If you need to service your return pump, you better hope you have a union installed. The best way to look at this is to plan in advance any possible reasons you would want to be able to dismantle your plumbing. A couple examples:
You're moving, you need to dismantle the tank, but you didn't use unions. Now you're forced to cut all your plumbing away. Next example is if you want to remove your sump for replacement, or cleaning. With unions, all you have to do is unthread the nut, then remove your sump. Just make sure to account for the rubber o ring so you don't lose it.
Also, make sure that you have the nut installed onto the fitting prior to glueing it up. You don't want to glue the union on, only to find that you forgot to include the nut! Don't laugh, I've done it and had to pull the union off really quickly before the glue set.
Ball Valves:
Ball valves are very useful. They allow you to regulate flow, and also shut down flow. If you're going to spend some cash on plumbing, here is where you do it. Ball valves come in several types: lever handle, spigot type round handle, union ball valves. Union ball valves are pretty nice. You can remove the valve so that you can clean it. Great invention!
Gate valves:
These are kind of like a ball valve with unions but allow you to dismantle the actual valve for cleaning. These are also extremely expensive lol!
Check Valves:
Some people swear by check valves for your return line, some people hate them. Here's why they're hated lol: The stick. Yup, that's all there is to it. Now how to get around that little fact is to make sure you engage that check valve regularly, as in every couple days. If you shut down your pumps to feed, awesome! If you don't, you'll probably have check valves that'll fail.
The biggest killer to ball valves, gate valves, check valves, etc is calcification. That's why it's always a good idea to have unions before and after a valve.
Important note regarding valves, unions, check valves, etc
When laying out your plumbing and purchasing your fittings, please make sure that you're buying "flow through" types. These are more expensive but what it basically means is that the if the fitting is 1", the entire valve is 1" all the way through.
If you can't find "flow through", buy one size up. So if your return line is 3/4", you have to buy a 1" union/valve/etc. and buy 3/4" reducer bushings. Sounds stupid right? Try this experiment next time you go to HD, Lowes, Menards: pick up a 3/4" fitting, now pick up a 3/4" union/valve/etc. Look through them. The 3/4" union/valve/etc is smaller than 3/4". If you have any fitting in your plumbing line that is smaller than your pipe, the whole line effectively becomes the smaller size. So what you want to do is compare the unions/valves/etc to what size pipe you're working with, and make sure to get the union/valve/fitting that matches and doesn't bottleneck your flow.