Funlad3's 45 Gallon 3' x 2' x 1' Acropora Lagoon

Funlad3

Well-known member
This is a cool build. Why did you choose to use the PCB board from black boxes and not just use the whole black box? What does deconstructing it do for you?
The biggest reason was that I wanted to save the space that the boxes took up and move around the potentiometers and drivers that were attached to the box itself. I guess I also have a more open space in the canopy that might make the fans a little bit more efficient at moving air around, but that's just a bonus.
 

Funlad3

Well-known member
I did what I could today without my bulkheads, and that ended up being a lot.

First, I cut the stand down to its final size and broke out the router to cut my plywood flush with the rest of the stand:
IMG_1325.jpeg

I left an extra 3" around the front and sides of the tank with 6" at the back so that I have extra room to feed pipes and plumbing. Here's what the tank looks like on the stand:
IMG_1327.jpeg

With my massive 1.5" overflow hole in the back of the tank, I was only able to fill it halfway to check for leaks. There were none, and there was only 1/16" of bowing, which I'm totally comfortable with.
IMG_1333.jpeg

That took me most of the day, so I devoted the night to getting my wiring done in the canopy. First I got my old T5 retrofit kit wired up. These bulbs are years old, and I checked the PAR at the front edge of the canopy; they only peaked at 300 through 6" of air:
IMG_1335.jpeg

Then I wired everything else to my switches and WiFi smart outlet. It looks more chaotic than it actually is; I'll put up a diagram tomorrow:
IMG_1336.jpeg

And somehow, everything turned on the way it was supposed to on my first wiring attempt! With everything fired up at once, the PAR from 6" jumped from 300 to over 2500, and that's still with bad T5s. This light is gonna be a monster, and I'm thrilled with how it's turned out so far:
IMG_1342.jpeg

Tomorrow, I'm going to see if I can get the last part for my overflow and track down a black yoga mat to put under the tank. If I can, I might even start plumbing tomorrow. If not, I still need to wire up my fans and mount them and my potentiometers for the LEDs. Either way, the tank should be up and running by the weekend!
 

((FORDTECH))

Premium member
Hi all! I've been madly bored while everything is shut down to mitigate the pandemic, so I finally gave in and decided to set up a build for some random acros. I used to sell commercially years ago back in highschool, and I haven't had a proper tank to grow things out in since. I'm a huge wild Acropora collector, so this tank should fill in quickly. The plan is to grow out frags/chunks from different colonies and see what I can turn them into alongside some old classics. The other gimmick that I'm sticking with for this build is that I'm trying to scavenge/repair/recycle as much equipment as possible. Thankfully, I have plenty of old equipment sitting around, but I've already got to meet with other local reefers and had to dig around on Craigslist for other materials.

Here are some specs of what this build will include!

3' x 2' x 1' Shallow Lagoon Peninsula
Custom T5/LED Lights
Two Maxpect Gyre XF250
50ish Pounds of Pukani
40 Breeder Sump
Ecotech Vectra M1
Reef Octopus 150 NWB Skimmer
Neptune Apex Classic
Ancient Geo's Reef (I think?) Calcium Reactor with Milwaukee Regulator

So here's where things get fun. I've been building tanks for years, but my long-time reefing buddy @kerber13 convinced me to try to cut my own glass for a small desktop build. Small is boring and I had some glass laying around, so I decided to cut apart some tanks that I had laying around, which was moderately successful? I broke some tanks, and I was lucky enough to have some local reefers bail me out with extra tanks (thanks, @Reefaholic ). I used 40 Breeders for the 36" long panels and a 20 Long for the 24" long panels. Cutting 1/4" glass is easy when it decides to break where it's supposed to. That doesn't always happen.

A sacrificial 40 Breeder:


Cutting apart the rim:


Rimless (right before I tore the panels apart):


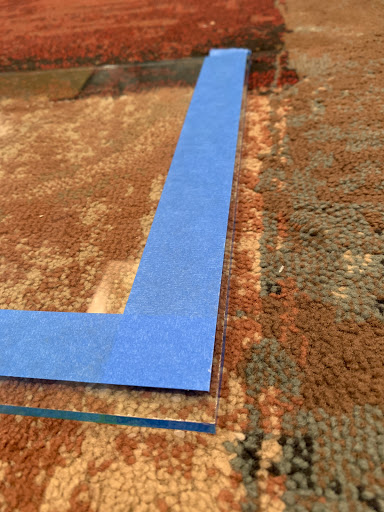
Cutting a 36" long strip of 4" wide glass from my 36" x 16" 40 Breeder panels didn't go well and left jagged edges on my 36" x 12" peninsula panels:


Two 30" x 12" panels from a 20 Gallon that I tore apart:


Cutting 6" off of the 30" panel to get to my 24"x12" side panel:


I ground the few jagged edges on my 36" panels and clamped my four sides together. The grinding isn't perfect, but it's good enough.


I also drilled some holes for the plumbing on the 20" back panel. The 1.5" hole is for the overflow box. There are two 3/4" drain holes.


I took the tank apart and taped up all of the edges so that I can silicone it nice and cleanly! I'm using the injection method of building this tank, which is why the taping is 1/4" off on the sides of the short panels (pictured):


So! At this point, the tank was all taped up and I was using 90º clamps to hold the panels in place, so I decided to do some dry scaping with my rock. A friend is getting to ready to move out of town, so I snagged a bunch of bleached/cleaned Pukani rock for dirt cheap. Here's what I had to work with:


And this is what I ended up with. Top view:


Front left:


Front right:


Right side:


Front:


Left (there's more room between the rock and the glass than the picture shows; the extra-wide painter's tape hides the gap)


This tank is only 12" deep (11 3/4" when I finally get the bottom panel), so I wanted to keep the rockwork low so that my acros have room to grow vertically. Here's a rim-level side profile showing how I did. The tallest point of the scape is exactly 3" below the rim. After I subtract for the bottom panel and water level, I'll still have about 2" of water from the absolute top of the rocks and closer to 6" throughout the rest of the tank.


For the sump, I was going to build a custom 30"x18"x14" tank and throw in baffles and a sock holder, but I'm thoroughly tired of taking tanks apart. I caved and bought a 40 Breeder (after I destroyed two of them getting the glass for the DT. Oops). I'm going to use some scrap glass as a lid for the drain/filter sock chamber, and I have oversized skimmer and return chambers. I had the Reef Octopus and Vectra sitting around from my 24G nano build from two years ago, and I can always use even larger equipment with this sump in the future.


Putting in an 8" bubble trap:


Putting in two baffles for my filter sock holder. I'm going to cut the holder itself from some acrylic that should be arriving later today:


For lights, I have a super old 48x3W LED board that I originally ordered back in 2011ish. Two years ago, I cut it in half to fit into my Nanocube hood. Now I'm going to lay the two halves of the board into the middle of a custom hybrid fixture, but first I have to replace some of the broken LEDs. Luckily, I found some replacement diodes for $0.80 apiece on Amazon.


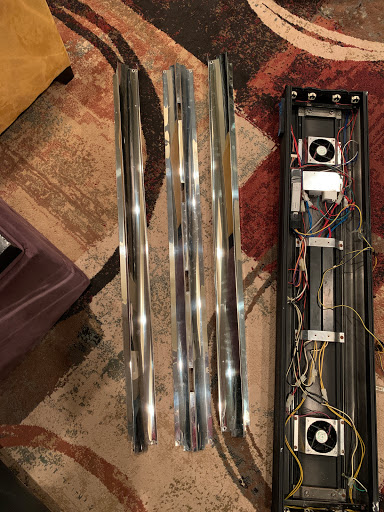
For the T5 part, I had an old 4x39W retrofit kit left over from my old growout tank that I took down in 2014. I managed to ruin the reflectors, so I got a 4' Aquaticlife T5 fixture from @((FORDTECH)) that I gutted for the reflectors and fans. I'm going to cut the center channel in half and end up with two 36" T5s on either side of my rebuilt LEDs. Check out this wild three-piece four bulb reflector:


That's where I'm at for today. I ordered the bottom tank panel from a glass shop because I couldn't find any 36" x 24" glass locally, and that should be done by the weekend. Once it is, I can silicone the tank together and let it sit for a few days before I leak test it. In the mean time, I need to build a stand and canopy, cut my filter sock holder, and get my lights put together. With any luck, I can get this tank fully up and running by next weekend. I already have my eye on some nice Aussie colonies and I have a store owner tracking me down some fish; this should all progress quickly. I'll leave you all with a picture of my old nano before from before it crashed out. Too many corals, not enough water volume.


(Also I swear the next round of posts will have better photo quality. I just realized that the forum isn't running vBulletin anymore and I guess I have to stop hosting my photos on Facebook. I used Blogger for this post, and the compression is wild.)
Now I see what your using the reflectors for :) this build looks great I’m definitely interested so gunna follow. Great job on everything so far
 

Funlad3

Well-known member
Now I see what your using the reflectors for :) this build looks great I’m definitely interested so gunna follow. Great job on everything so far
I'm glad that I was able to put them to good use! New T5s get here this afternoon, so they're about to have a lot more light to kick back into the tank. :)
 

Funlad3

Well-known member
Today was another busy day, but first the wiring diagram from yesterday! I'm using a WiFi outlet to turn my three channels (Blues, Whites, T5s) on and off, but I also wanted to be able to manually override the schedule to turn individual channels on or off for viewing and photos. I came up with this rig that utilizes Three Position Rocker Switches to let me do that. Basically, the middle terminal carries power from either Position I (controlled by the WiFi outlet) or Position II (power from an outlet that stays on). If I set the switch the middle position (Position 0), it breaks the circuit and that channel is off. Here's how it's wired (shout out to @jayjigga for making sure I didn't accidentally blow a circuit or set something on fire):
Canopy Wiring Diagram (Final).jpg

So onto today. My order from BRS finally came and I got all of the bulkheads that I've been waiting on. That meant that I got to finish up my internal overflow box; the 1.5" bulkhead inside has to be put into the overflow before it gets glued together, so I drove across town to pick up my 3D printed set of overflow teeth from a cousin.
IMG_1343.jpeg

Here's a better look at how the internal and external overflow boxes fit together. I cut about 1" off the back of the 1.5" bulkhead so there's more room for the water to flow into the external overflow box:IMG_1347.jpeg

With most of the big projects for this build coming together, it was time to get the stand inside and get the tank settled. The stand is 30" wide, so it had to be taken apart to fit inside.
IMG_1348.jpeg

And finally, I got my scape back together! I took about 20 pictures a few weeks back when I took my mock-up apart, so it only took about half an hour to put it back together. I tweaked a few things, and I'm thrilled with how it turned out. I did my best to avoid straight line contours at the edges while keeping a steady slope upwards towards the back of the tank. There a ton of caves and crevices, so I should be in good shape for breaking up sight lines to minimize aggression.
IMG_1351.jpeg

IMG_1352.jpeg

IMG_1353.jpeg

IMG_1355.jpeg

A quick look at the mounted overflow (the color of the 3D printed teeth should blend in with the box once it's wet):IMG_1356.jpeg

The external overflow box, waiting for Bean Animal plumbing:IMG_1357.jpeg

That's all for now! I'm going to get the plumbing done today and get some water running to check for leaks. If it clears, then I'll toss in the salt, my Fritz Turbo Start, and then some sand!
 

Funlad3

Well-known member
Just two pictures, but there was a lot of work behind them.

Plumbing is done! There was one pinhole leak on a seam of the external overflow box, but I dried it up and applied more acrylic solvent/glue. I still need to get some threaded/slip adapters to I can put the drains coming from the sump bulkheads underneath the sump water line; the 1/4" gap splashes a ton, but that should go away once I get the drains underwater. The Vectra M1 is pushing so much water that my 1" gate valve is fully open and the secondary 1" drain is pretty close to a full siphon as well; this'll take some fine tuning, but it's already pretty quiet aside from the fixable splashing:
IMG_1361.jpeg

And finally, the tank! The water level goes up or down based on how high I have the Vectra set, so I can play around with how much height I have from the rim. This is what it looks like right now with the return pump off:
IMG_1363.jpeg

Later today, I'm going to get the tank quieted down some, and then the salt and heater will go in. Once it's clear, I'll add sand. The tank is getting there!
 

Funlad3

Well-known member
dang that looks clean ...
you will be adding sticks in no time ..
Thanks! If I were running this no rock or sand, I'd have corals in within the next few days. With this rock though, I'm going to take it a bit slower and see if I get any sort of a cycle or nutrient spike. It was supposedly cycled/had a full round of Doctor Tim's Waste Away before it was bleached, but I'm still betting there's still some nutrients that need to be processed.
 

Funlad3

Well-known member
Today, I got the adapters that I needed to completely silence my plumbing. Now the only noise from the system is the water dripping into the filter socks. Anyone have any ideas on how to quiet that down? Otherwise, I can live with it, especially when I get around to skinning the stand.

The tank running with RO and at the proper water level:
61308900962__6E6312D4-5C63-44C0-9D83-F4DD5B7B598F.JPG

A closeup of the overflow box in action:
61309343381__44FBA82D-7310-4379-ACCA-5EEFC75E8D7D.JPG

And I just finished mixing in salt and adding sand! Once I even it out, I'll probably have 2-3" across the whole tank. I may remove some, but I have plenty of time to decide:
IMG_1372.jpg

And I officially have fish in quarantine! I asked Fabio @SevenSeasAquaticLife to track me down a few tangs and "anything else unusual" from Hawaii. Well, he delivered big time, and I now have a male/female pair of Spotted Boxfish (Ostracion meleagris):
61308877150__0B25ABA3-6B39-4D5A-AA47-558D12B8D6BD.JPG

I won't be able to tell if the boxes are from Hawaii or the greater Indo-Pacific until the male gets larger, but they're some of my favorite fish to chase around with my camera in Maui. They're still shy and will definitely benefit from some power feeding, but I'm super excited to work with these fish. The female is definitely more shy and cautious than the male (which I've already seen lunge at the female once or twice), but I moved around the rock in the QT to give them more hiding places and to diffuse aggression. Once I get them and the naso eating, they'll all go through three weeks of copper before making it into the SPS Lagoon:
IMG_1369.jpg

I'm adding the Turbo Start to the lagoon shortly, and I want to get the light hung over the tank by the end of the weekend. We'll see what else I manage to get done!
 

Funlad3

Well-known member
I don’t want to be the tang police, but..... naso in 45 gallons?

No worries! I have a 6' 125 gallon downstairs that I can move it into when it gets too large. It's still only about 3", so it should do fine in the 3'x2' footprint for now.
 

Sawdonkey

Premium member
No worries! I have a 6' 125 gallon downstairs that I can move it into when it gets too large. It's still only about 3", so it should do fine in the 3'x2' footprint for now.
I figured this or something like it was the case...you’re not new to this!
 

Funlad3

Well-known member
I figured this or something like it was the case...you’re not new to this!
I'm honestly more worried about the boxes having enough space; they're big and they love rock crevices, so I'll have to see how they behave once they make it into the lagoon.
 

dvanlier05

Active member
I was having the same problem when I first set my tank up. I ended up putting a union on the drain pipes to extend it down under the water line in the sump. Only problem is that you have to kill the return pump to change them but I just do it when I'm feeding the corals twice a week.
20200606_052801.jpg
 

Funlad3

Well-known member
So this is what I got done yesterday:

I put an eggcrate divider in the QT (with a Naso-sized hole) to stop the male boxfish from nipping at the female. Both are way more calm today and were more interested in food than yesterday. I'm going to run out to the store tomorrow to get some PE mysis, which I expect they'll finally eat:
IMG_1374.jpg

I resized the canopy lid and drilled five holes for fans to keep the light cool:
IMG_1375.jpeg

I rewired and mounted the potentiometers so I can independently dim the LED channels:
IMG_1376.jpeg

And I mounted the canopy! It hangs high enough that you don't see the LEDs or T5s when looking at the tank and low enough that it doesn't bleed direct light across the whole room. Here's a phone pic:
IMG_1377.jpeg

And a filtered phone pic:
IMG_1378.jpeg

I have my color spectrum and schedule set with the blue channel on at 100% for 12 hours, the whites on at the lowest possible power (10-20%?) for 8 hours, and the T5s on for 4 hours. With all three channels on, PAR peaks at 550 at the top of the tallest rock and about 320 on the sand bed. With the Blue and White LEDs, I get about 500 PAR at the top of the rocks and 300 at the sandbed. With just the Blue LEDs, I get about 320 PAR at the top of the rocks and 220 at the sandbed. I think I'll have to turn the Blue channel down a little so that I don't totally fry new additions, but I'm pretty close to the light intensity that I want.

I'm going to keep an eye on nutrient levels for the next few days, but with the double dose of Turbo Start that I added, the tank should pretty much be good to go for test corals. We'll see how long I'm able to hold off from adding something to test the tank out.
 

Funlad3

Well-known member
I was having the same problem when I first set my tank up. I ended up putting a union on the drain pipes to extend it down under the water line in the sump. Only problem is that you have to kill the return pump to change them but I just do it when I'm feeding the corals twice a week.
I've isolated the dripping sound to the water that makes it around the collar of the filter sock instead of going through it. My filter sock holder is about 5" higher than the water level in the next chamber, so I think I just have to figure out how to limit the water that doesn't make it into the socks.
 

Funlad3

Well-known member
The female boxfish is officially eating. Now I just need to get the male to follow suit.


Funlad3

Well-known member
I have a few acro colonies sitting in a different tank until I'm confident that this one is ready, but I couldn't wait any longer and had to add some test pieces of coral to the lagoon.

Here's a rainbow acan that I couldn't resist. It puffed up right away and looks as happy as can be:
IMG_4754.JPG

And here's a chunk of a Spath that I have. It should end up blue/green/purple, but the coralites are throwing off some weird orange under all blues. If this chunk does well, I'll move over the big colony. You can tell that it's a recent import by the size of the polyps. Once I start adding coral foods and it settles in, they should get big and colorful:
IMG_4757.JPG

I adjusted my lights so that with my three channels on, I range from 150 PAR on the sandbed to 250 PAR midway through the rocks. This tank is obviously still super new and has very low nutrients, so the last thing I want to do is burn things up. Once I fill it in more, I'll turn the lights up to 250 PAR at the sand and 350+ at the rocks.
 
Top